My Shop!

Showing posts with label Sewing. Show all posts

Friday, July 13

2011 Tutorial Round-up : Upcycled Sweater Mittens (December 2011)

(dated December 2011)
written by Pamela Pilon of Bibmababy Online
(ETSY, FACEBOOK)
Appeared in Home Grown, Parenting in the North Magazine (ISSUE 6)

Back in December, I released a tutorial for a  easy peasy mittens made from a felted upcycled sweater. 


What does upcycled mean exactly? It simply means recycling to make something even better. Don't throw out that ugly sweater! Throw it in the wash on hot and shrink it to make fun mittens!


PREPARATION TIME

Approximately 1 hour without counting the felting time, but I'm mastered it to be done within 30 minutes.


FELTING YOUR SWEATER

Do what Mom told you NEVER to do. Throw that sweater in the washing machine with your towels on a hot cycle, using only half of the recommended amount of soap. Then throw it into the dryer for a few hot cycles.  To avoid fiber migration from the sweater to your towels (or even possibly clogging up your drain), throw your sweater into a pillowcase and tie a knot at the top. This should catch most of the flyaway fibers. If done right, your sweater will shrink to about a third of it’s size. 


WHAT YOU NEED
  • Paper and pencil or marker
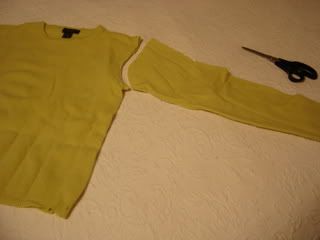
  • 1 wool sweater (minimum 80% wool, 100% merino works best)
  •  Scissors 
  • Sewing machine, needle and coordinating thread

MAKING THE PATTERN

    1.     Place your hand on a piece of paper, with your fingers slightly apart. Using a pencil or marker, trace a mitten shape round your hand.
    2.     Retrace a second line about 1 inch away from your hand line trace. This second line is your sewing line. 
    3.     Now trace a third line ¼ inch away from your second line. This third line is your cutting line.
    4.     Draw a line at your wrist bone, to mark how far from this point you’d like for your mittens to sit.  
    *You can also affix at elastic at this point, but I found the stretch in my felted sweater was enough for me.
    5.     Draw the length of the mitten at about 3.5 inches past the wrist bone.


    CUTTING THE FELT

    6.     Lay your sweater flat onto the table. Use the pattern you created to cut out a total of four mitten pieces. When using a felted sweater, there is no need to worry about fabric direction.
    7.     If you decide to use an elastic, with a fabric marker, mark the elastic placement line on the wrong side of each cut-out.


    MAKING THE MITTENS
    * Unless otherwise noted, all seams are a ¼ inch allowance.

    8.     Match two of the hand cutouts with right sides together, and stitch the outer edge using a ½ inch seam allowance. If you decide to use elastic, end this stitch 2 inches above the wrist bone when you will be sewing the elastic.
    9.     Repeat for the second mitten.
    10. Open both mittens flat, and finger-press the seam open.


    OPTION: Embellishments
    Use ribbon and/or faux fur and stitch at the seam edge.

    OPTION: Elastic wrist
    On the wrong side of the mitten, measure the width of wrist bone line you drew with the fabric marker. Subtract 1 inch and cut 2 of this length of elastic. Stitch the elastic in place at the seam allowance. Stretch the elastic across the wrist bone line and hold the elastic in place while you zig-zag stitch the elastic. Stitch the end of the elastic in place with a straight stitch.


    FINISHING TOUCHES

    13.  Fold each mitten in half, with right sides together. Stitch through all layers around each mitten’s edge. Clip out the seam allowances of all curves. Turn over the mittens and enjoy!  

    Note: Mittens didn’t turn out? You can also use them at a cutlery and napkin holder for your Christmas table setting!


    You can find all these tutorials and other great articles in Homegrown, Parenting in the North (FACEBOOK, WEB, ISSUE).

    Saturday, June 9

    Pattern Review: The Spin Around Dress

    My take on the Spin-Around Dress.

    Top to Bottom: Unknown print, Michael Miller Gerberalicious,
    Kona Solid Black
    Last week, I received a link to this super duper cute dress pattern in my email from one of the hundreds of blogs that I am subscribed to. I fell in love with it, and knew exactly what I was going to use in terms of fabric. When my daughter was a wee baby, my mom purchased a metre of Michael Miller's Gerberalicious in Red print.


    Spin-Around Dress comes in 2T only.
    The FREE tutorial is available for print here: http://littlecomettails.com/2009/10/it-spin-around-a-molly-size-freebie-dress-pattern/ .

    I was so excited to get my hands dirty. After about 10 minutes of reading and then re-reading the pattern. I didn't find it so user-friendly; especially for a beginner.

    First things first, WASH and DRY your fabrics to pre-shrink them before cutting your pieces. This will avoid your dress shrinking in the wash. Next step.. IRON!!!  It ensures a proper cut-out.

    Once you've prepped your fabric, print out the pattern and piece them together. Don't be surprised if it doesn't exactly go as planned. I was bothered that after I followed the instructions,... I realized that the alignment is slightly off.
    Ensure that the print options are at scaling: none.

    I suggest to use your better judgement to find exactly where the lines should meet up rather than just thinking you can butt the pages side-by-side. You can tell a bit by the picture below that there was about a 1/4 inch gap between 2 of the pieces of paper. I was afraid that I might have been the one to not have read the instructions properly, but end result shows that I did the right thing by placing were the paper SHOULD be, and not butting them together.

    I cut out all the pieces required by the instructions. I found however, that the instructions for the sash was rather vague. Since I am experienced,  I just winged it.  Be sure you pay very close attention as to the direction of the fabric when you are cutting. When you cut the front and back pieces, ensure that you're not cutting a back piece in the same direction twice.

    Ensure your pieces are ironed before cutting.
    This will make your entire project easier to handle.
    When you get to the point of having the sew your top pieces together. Sit and think. Think long and hard. I don't know if I was tired, but I got VERY frustrated at one point because whatever I'd sew.. I'd soon realize I had sewn a piece that would prevent me from folding the top inside out to be able to have a clean finish before I was ready to top-stitch.  At this point, the seam ripper came in real handy... several times.. to the point I wanted to throw the whole thing out the window.

    Sit Back. Relax. Breathe. Continue.

    The next thing that I would suggest at this point, is plug in the iron, and get ready to take your time and iron flat. I promise you, it will make your life a million times easier if you take the 5 minutes to iron your pieces flat before you top-stitch the collar. The next part doesn't come as easy...

    Sew the neck hole, Topstitch then focus on the armholes.
    Trying to top-stitch the neck afterward will frustrate you.
    I got confused a lot with where I should be sewing. The armholes are sewn to themselves... and NOT to the facing fabric. .. So... Red sewn to red,... black sewn to black. That was one big mistake. I blame it on being tired and lack of instruction.

    This is where I starting losing all hope in the project. I took a minute to reread the instructions, swore a few times and then decided to scrap it and use my better judgement.

    Enter my serger...

    I serged the bottom to prep it for the trim.
    You can also just achieve this by
    creating a zig-zag stitch.
    Anytime I'm sick and tired of having to over think a pattern, I finish the seams with a serger. If you don't own a serger, I highly recommend you get your hands on one... You can get a decent Singer (that's what I did!) for about $250. Word to the wise, replace the thread with a higher grade cotton thread. Otherwise you'll hate your serger when you realize it takes 10 minutes to thread... and the thread keeps snapping.

    Moving along... 

    I serged the top of the dress to the bottom part by sliding the skirt over the top, waists touching print side touching. I then topstitched the serged part down for a clean look.

    I was pretty happy with the outcome of serging these pieces together. I tried it out on my mannequin, added the sash, and realized I HATED the length. It felt outdated, and I was aiming for more of a cocktail dress type of feel.

    So I took the dress back to the drawing board. I measured a line about 4 inches higher than the original hem line.

    Brilliant! I was closer to my goal!

    I shortened the bottom by 4 inches.
    My last hurdle was trying to hem the dress without it looking half-finished. I tinkered around with making a 2-inch hemline in black, but it looked too heavy like it was fighting with the sash. I sat and thought about it for a while... then I realized I had about 5 metres of bias tape sitting in front of me.

    Lightbulb!

    If you've never had the pleasure of using double-wide bias tape... I present you with this youtube tutorial http://www.youtube.com/watch?v=4fEv3VXPUEs ...

    See video at the end of this review.
    After much thought, I used an
    Extra-Wide Double Bias Tape.
    All in all - the instructions to this tutorial needs some work, however, it is a good resource to have a printed pattern available for cutouts. My suggestion is this. Use common-sense.

    Another great bias-tape tutorial can be found on another favourite web site of mine, Smashed Peas and Carrots.
    http://smashedpeasandcarrots.blogspot.ca/2011/01/how-to-sew-bias-tape-tutorial.html


    Thursday, March 1

    2011 Tutorial Round-up: Tooth Fairy Pillow (November 2011)

    (dated November 2011)
    written by Pamela Pilon of Bibmababy Online
    (ETSY, FACEBOOK)
    Appeared in Home Grown, Parenting in the North Magazine (ISSUE 5)

    Back in November, I released a tutorial for a Tooth Fairy Pillow, an ideal presentation to swap teeth for cash. You could also alter this pattern to make a Soother Fairy Pillow. Just a little imagination is needed. * Click on the images for a larger view.

    PREPARATION TIME

    Approximately 1 hour


    WHAT YOU NEED

    • Printer to print out the Pillow Pattern Pattern available HERE
    • ½ meter for tooth (quilter’s cotton)
    • 5 inches x 5 inches for pocket (quilter’s cotton)
    • 5 inches of bias tape
    • Batting
    • Fabric pencil
    • Ruler
    • Rotary cutter and mat or scissors
    • Sewing machine, needle and coordinating thread


    CUTTING YOUR MATERIAL

    • Exterior Print -Cut 2 of the pillow patterns
    • Pocket
      - Cut 1 pocket
      - Cut 1 strip of bias tape, the same width as the pocket


    POCKET

    * Unless otherwise noted, all seams are a ¼ inch allowance.

    1. Sew the bias tape to the long edge of the pocket square. Backstitch at both ends.
    2. Cut excess tape.


    3. Fold the short sides under by ½ inch. Press.

    4. Fold the bottom of the Pocket Square under by ½ inch. Press.


    5. Using one of your tooth cutouts, print-side facing up, place your pocket square in the center of the tooth. Pin in place.
    6. Stitch the pocket beginning at the top left corner, going down the edges at inch, and come across the bottom and then finally up the right side. Leave the top unstitched and remember to back stitch at the beginning and the end.


    ASSEMBLING THE TOOTH
    1. With print sides together, pin in place.
    2. Stitch the raw edges together, leaving a gap open (as noted on the pattern) to allow to turn the pillow inside out and backstitch at the beginning and end of your stitch.


    STUFFING THE PILLOW

    1. Turn the pillow right side out through the gap you left in step 7.
    2. Using batting, stuff the pillow by tearing small pieces of batting and stuffing into the roots of the tooth first. Packing it in tightly.


    FINISHING TOUCHES

    1. Pin the hole closed and stitch using a needle and some thread.


    Note: You can also alter this design by folding over a ribbon to create a loop and stitch the raw ends into the hole using your sewing machine and top stitching it closed.


    You can find all these tutorials and other great articles in Homegrown, Parenting in the North (FACEBOOK, WEB, ISSUE).

    Thursday, January 26

    2011 Tutorial Round-up: Toddler Bag (October 2011)

    (dated October 2011)
    written by Pamela Pilon of Bibmababy Online (ETSY, FACEBOOK)
    Appeared in Home Grown, Parenting in the North Magazine (ISSUE 4)

    Back in October, I released a tutorial for a Toddler Size Trick or Treat Bag, perfect for Halloween treats! Why not look at this bag from a different angle,... choose a different fabric and you've easily got yourself a great lunch bag, something to replace your purse, a wet bag for your pool swimwear, oh even just a toy bag to carry your child's favourite things to daycare!


    PREPARATION TIME

    Approximately 2 hours and 15 minutes


    WHAT YOU NEED

    • ½ meter for outside (quilter’s cotton)
    • ½ meter for lining (quilter’s cotton)
    • ¼ meter Fusible Fleece
    • Fabric pencil
    • Ruler
    • Rotary cutter and mat or scissors
    • Sewing machine and coordinating thread


    CUTTING YOUR MATERIAL

    • Exterior Print - Cut 2 rectangles 12 inches x 15 inches
    • Lining - Cut 2 rectangles, 12 inches x 15 inches
    • Straps - Cut 2 rectangles, 5 inches x 17 inches of print or lining
    • - Cut 4 strips, 1 inch by 16.5 inches of fusible fleece


    ASSEMBLING the EXTERIOR of the BAG

    * Unless otherwise noted, all seams are a ¼ inch allowance.

    1. Sew around the sides and bottom of the exterior print. Backstitch at both ends. (Note: Zigzag stitch both seam flaps if you want durability.)

    2. Press side seams open.


    CREATING BOX CORNERS

    3. Measure 2 inches by 2 inches on the bottom corners of your bag. Mark a dot at the point where the measurements intersect. Do this on both sides of the bottom of the bag. This should leave you with 4 dots.

    4. Put your hand in the bag at the corner and pinch the side and bottom seams together.

    5. Line up your side and bottom seam into a triangle.

    6. Pin at 2 inches from the corner.

    7. Stitch a straight line. Backstitch at both ends.

    8. Trim the excess.

    9. Repeat this process on the other corner of the bag.


    ASSEMBLING the LINING

    10. Repeat Steps 1-2 with ONE EXCEPTION. When sewing around the sides, leave a 5 inch opening at the bottom to allow you to turn your bag inside out after sewing the bag and lining together.

    11. Repeat the Box Corners (Steps 3-9) for the Lining.


    BAG ASSEMBLY

    12. Turn the lining inside out and stuff into your print bag.
    (The print bag should still be wrong side out.)
    The right sides of the fabrics should be facing each other.

    13. Match the side seams and edges together.
    Pin and sew with a ½ inch seam allowance around the entire top of the bag.

    14. Turn the bag right side out through the 5 inch gap you left at the bottom of the lining.

    15. Topstitch the hole closed.

    16. Insert the Lining back into the back, iron the bag mouth and topstitch ½ inch from the edge.


    MAKING THE STRAPS

    17. Take your 5 inch x 17 inch pieces and iron ¼ inch edge on both ends.

    18. Fold the strap in half lengthwise.
    Iron flat to create a crease in the middle.

    19. Open the strap, and fold each raw side to meet at the middle crease. Iron Flat.

    20. Open the fold and place 2 strips of the fusible fleece, placing one on each side of the crease.

    21. Refold at the crease, hiding the strips of Fusible Fleece.

    22. Iron as per instructions on your package of Fusible Fleece.

    23. Refold at the crease to hide raw edges and sew on all sides at 1/8 inch.

    24. Repeat steps 17-23 to make another strap.

    25. Attach one end of each strap to the bag at 2 inches from each side and 2 inches down (this will meet cleanly with the box corners).
    Choose which directions the handles will be facing at the point.

    26. Sew the strap onto the bag using a box pattern and then sewing an “X” in the middle of the box for strength.

    27. Do the same for all 4 sides.


    You can find all these tutorials and other great articles in Homegrown, Parenting in the North (FACEBOOK, WEB, ISSUE).

    Monday, October 3

    Happy Birthday!

    Ok, I'm a little late on this post, granted things have been crazy in my life. My baby girl turned 1 this past month - and I think I went overboard on the party planning. Thanks to Cakes by Lee (Facebook) and Gymboree Play and Music Ottawa (FACEBOOK) (WEB) - complete with Gymbo kisses!, my Dr. Seuss themed birthday was a success! Grandma was prepping the fun blue and black striped pasta salad and the Green Eggs and Ham platter while I finally finished her Dr. Seuss quilt on time (with 30 minutes to spare) for her big reveal. I'm so happy that she loves her blanket. We got her a matching Cat in the Hat stuffed doll from Eko Bear (FACEBOOK) (WEB).

    This also meant that my Mat Leave has finally come to an end, and I've gone back to work - or more specifically, an empty office. To help spread the word that I'm looking for new opportunities and to share my industry knowledge, I decided to start teaching. With the slew of responsibilities I now hold, Bibmababy has unfortunately taken a back seat to my hectic life - as has this blog obviously... I'm going to attempt to update you on some of the going ons.

    I have taken up writing for a northern Ontario parenting magazine called HomeGrown Parenting, In the North (FACEBOOK) (WEB). My role is mostly creating sewing tutorials. However, I have added a few of my personal ideas into the mix. Writing my first issue was a bit of a learning curve. I outlined how to create this lunch bag out of a light canvas and even though I claim it only takes an hour and a half to make... between taking pictures and writing as I was sewing with my laptop next to my sewing machine, it was probably more like 3 hours.

    I've also written about a Toddler-sized version of a Halloween Trick or Treat Bag, and in November, you'll learn about a Tooth Fairy Pillow.

    I'm always open to new sewing ideas, and I need to come up with something for the Winter Holidays. I'm like to stay away from the Christmas theme, however, I have a lot of cute fabric just screaming to make an appearance.

    I've also tried desperately to finish the blouse dress from a few months back - I think I failed on that one. It was going soooo well, and then I think I chose a blouse that was just too complicated to work with. It looks great on the mannequin, but it just doesn't sit right on my baby girl. Back to the drawing board? Or maybe I should just call it quits on this one.

    Thursday, July 14

    Attempting the Shirt Dress

    Awesome finds today at The Clothes Secret on Bank Street here in Ottawa. Paid $3.50 each and I'm thinking of turning these gems into one-of-a-kind summer dresses. I've been browsing and I found a few very cute patterns from some of my favorite sewing blogs. I think that I'm going to "wing it". Having a toddler sized mannequin really helps...
    And I REALLY hope this last one is a joke. If I ever made this for my partner, he's probably move out.
    Wish me luck! I'll post pictures of my progress!

    Thursday, December 16

    Wool Soakers and Longies

    I visited a good friend of mine on Tuesday who surprised me with a REALLY cute pair of purple cashmere longies she had made for Kate out of a recycled sweater. I went out and bought 2 other sweaters a few weeks ago, and was waiting for a serger before trying my hand in this... ends up it's a LOT easier than I thought!

    So why was I paying upwards of $30 a pair in-stores???

    Martha's World offers a quick and simple pattern to create your own longies... and make a matching T-Shirt with the leftovers. Check her out! Her blog is quite informative. It's now part of my daily read. Please note, her site does not mention felting your wool first. Personally, I run my sweaters through a hot wash and toss them into the dryer to make them into itty bitty sweaters. http://marthasworld76.blogspot.com/2007/05/how-to-make-wool-soaker-from-recycled.html

    I will be posting all of them as soon as I have them all finished. Who knows,.. if I get good enough, maybe I'll start selling them on my site too! (PLUG HERE: http://www.etsy.com/shop/bibmababy)

    I'm trying my hand at these ridiculously cute wool soakers later when I can salvage about an hour of my day - who knew a baby was so time consuming? Stay tuned for pics! This woman offers a free pattern here.
    http://katrinassqs.blogspot.com/2010/09/just-soaker.html
    Older post: http://katrinassqs.blogspot.com/2007/10/instructions-for-sewing-soaker.html


    More Links:
    http://doityourselfec.blogspot.com/search/label/Wool-in-two%20training%20pants


    --------------


    Make your own Wool Wash!

    I use this recipe to clean all my wool diaper covers.
    1. Add a pea size of Lanolin to a cup of HOT water.
    2. Let it melt.
    3. Add a few drops of baby shampoo.
    4. Stir!
    and there's your lanolizing soap!

    To wash:
    1. Put about a teaspoon of your concoction into a tub of water.
    2. Swish the water to ensure even distribution of lanolin wash.
    3. Turn all your wool items inside out - careful colours may run!
    4. Soak for about an hour.
    5. Remove your wool and roll into a towel to remove moisture.
    6. Reshape and lay flat to dry. Hanging can distort the shape of your wool.